Thursday, December 20, 2012

Salt Dough Hand Ornaments - ON THE FENCE

My good friend Octavia Zuniga tested this Pin on making Salt Dough Hand Ornaments that look like Santa Claus.  I think it's an excellent idea and I am so glad she shared it with me along with the photos and her experience with this crafty project.

I have had great experience with the Salt Dough Footprint Keepsake so I knew this would be an easy and fun craft to do with kids.

Her main grievance is that once the ornaments are completed, they are far too heavy to hang on a Christmas tree so the term "ornament" should be used loosely here. Also, that is why I have labeled this pin as "on the fence."  It was a great and fun project to do with her kiddos, but at the same time it wasn't the same as the pin suggested and the use of the "ornament" on a tree is out of the question.

She did say that if you were to add some string and use a suction cup they would look very cute hanging on a window or using a nail on the wall.  Her idea now is to do this every year and hang them up as a sort of "growth chart" for each child which I think is a fantastic idea!

What you will need (along with paint)
This project did turn out awesome and I think very cute, they will just be used in a different way than the site suggested.


All done and very cute!!


Saturday, December 15, 2012

DIY No Sew Tutu - PROVEN

Madison has a photo shoot coming up for her 1st Birthday (don't even get me started on how my tiny infant morphed into a toddler)

Although I am already nostalgic about her first year with us, I am very excited to watch her grow up and to mark the occasion I decided to make her a tutu to wear in her photo shoot!

I used 2 separate guides from Pinterest to make this "No Sew Tutu."  They were both rather confusing in their own ways so I used them both and came upon my method using a combination of the two!

Link 1
Link 2

I went to Joann Fabric and purchased a total of 2 yards of tulle (net) fabric.  I realize now I should have probably had extra for those "just in case" moments, and to be honest I didn't read how much of it I would need before I went to the store...oops!

I ended up having just enough, I would have had extras if I hadn't cut it incorrectly to begin with.

Following Link 1's directions I decided that I would measure Madison's waist (18"), add 2 inches and cut my elastic (20") and tie it together.


After that I laid the tulle out and determined I wanted each strip to be about 8" long (following the guide on Link 2) I doubled that because when you tie the knots you lose length because they are folded in half.  I didn't measure the width of the strips exactly.  I figured 2-2 1/2" would be close enough (and it really made no difference in my opinion)


I had more purple tulle than pink so I used a pattern that I thought would work best to utilize all of my cut pieces.  I would use 2 purple in one knot and a purple/pink combination on the next knot.  I continued that pattern all the way around.

One tutorial tells you to use a chair back to hold the elastic while you tie on the knots.  The skirt I am making is for a tiny person and the chair back would have really stretched out the elastic so I used her walk and play toy handle instead!  Mom's learn how to improvise!!


When it came time to actually tie the knots, I was very confused as to how either tutorial did it but I believe the photo guide on Link 2 was best.  You want to fold the pieces in half, making a loop at the top.  Use your index finger and thumb to open the loop while holding the tails in your other hand.  Put your hand with the loops under the elastic and grab the tails with the same hand that is holding the loop and pull the tails through.  I hope that makes sense.  You do want all of your knots facing the same direction so do this method for the remainder of your tutu.

Half Done!

When I first started I was concerned, to be honest.  I didn't think that the material I got would be enough, I didn't think it would look good together for some reason and I thought that the tutu would be too flat. 

I could not have been more wrong.  As you add to the skirt with more and more knots the full effect of the tutu begins to form and I am so pleased with my results I will definitely do this a lot more throughout her life!

I really hope you try this one, it would make a great gift and I only spent $7.99 total for this project, and for my first time doing this and reading the directions as I went.....it only took me about 25 minutes!!


Saturday, December 8, 2012

Reindeer Cupcakes - PROVEN

My good friend, Amanda Benn found this super cute recipe online and sent it to me.  From the first time I saw it I knew we would have to try it as soon as possible.

These reindeer cupcakes were very easy and really fun to make!!


We doubled the batch so we would each have 2 dozen to share with friends and family, or to devour ourselves!


Okay, hold on to your hats and get ready to laugh at me, but I have never made cupcakes before, ever.  Not that I recall anyway, I am sure I have watched and "helped" my mom when I was a child but not in my adult life. 

We used Sixlets for the Reindeer eyes

I was no expert on filling the cups, I got cake mix everywhere at which point Amanda took over for me.  I was just making too much of a mess!!

I recommend making sure that ALL the cupcakes are completely done cooking.  When it came time to frost them, there were about 8 (out of 48) that were crumbling and falling apart, so we decided just to eat those and not decorate them! DARN! :)


We used red peanut butter M&Ms for the noses!
 
I think that they turned out amazing!  It was an awesome time with my great friend, Amanda and we got these delicious and adorable treats!!
 

We liked them better as Rudolphs!

Tuesday, December 4, 2012

Frozen Yogurt Covered Fruits - PROVEN

Frozen Yogust Covered Fruit

This idea, pictures and approval came to me from my good friend Katherine Subu.  She saw this awesome idea on Pinterest and gave it a try.  She then suggested it for my blog and took all the following pictures.

She said the recipe calls for plain vanilla greek yogurt, but she substituted that for Vanilla Honey Greek yogurt which sounds amazing all by itself!


Any fresh fruit would work great in this recipe but Kat used blueberries she had on hand :)


Finished Product! (Wish I was in New Jersey right now!)

She said they are DELISH and should be tried and shared!  Spread the word people!

P.S. if you try a pin and want me to share your results, like I did here, feel free to email me at jdenig@yahoo.com.

Thanks for reading!

Friday, November 30, 2012

Wall Art from Christmas Tree Ornaments - ON THE FENCE

I saw this awesome idea on Pinterest to put cheap dollar store ornaments into a shadow box and ta-da you have yourself some pretty neat wall art.

I went to Dollar General that very day and purchased some multi-colored--but mostly pink and purple--small ornaments, since they were to be used as a wall decoration in my daughter's room.

When I got home I discovered that I had grossly overestimated the depth of my shadow box and the ornaments were too large, even though I purchased the smallest round ones available.  This is my fault and why I have labeled this post as "on the fence."  If I am able to find an alternative shadow box I will definitely try this again. 

For now, I stuck the ornaments in a glass boot and some mason jars with little battery operated candles, which is cute enough for now, it adds a nice splash of color to the counter and when the lights are off in the kitchen the candles create a nice warm glow.


I will try the shadow box idea if I can get my hands on one with more depth and for a reasonable price!

If you have tried this idea, please share your results with me!  I would love to hear your story!

South Dakota Meat Loaf - PROVEN

This is yet another pin that I created on Pinterest found in my Taste of Home cookbook that we received as a wedding present.

Meat Loaf has always been a favorite of my husband's so I wanted to make him one that we could both enjoy since I wasn't too fond of it to begin with.  My mom didn't make it all that often, I don't think either one of my parent's were huge fans. 

I found this South Dakota Meat Loaf recipe and decided to give it a go.  This was about 5 years ago!!

Meat Loaf is sort of a love or hate food and I thought I hated it.  Not anymore!  This is a staple in our house and on our menu at least once a month.

The first time I made it I followed the directions exactly, now I use a little more Worcestershire sauce, a green pepper (if I have one) and basically more than double the recipe.  I usually make about a 3.5-4 lb meat loaf!!

Usually, I like to take after photos of my cooked meals, but we are usually so anxious to dig in I am having a hard time finding any!!  Enjoy :)


I don't know what about this recipe makes it "South Dakota-like" but I'll take it!

Wednesday, November 21, 2012

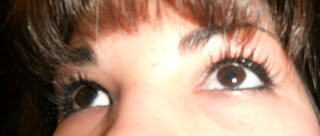
Make Real Lashes Look Fake - PROVEN

I've never really had a problem making my eyelashes appear long and lush, I was blessed with nice lashes at birth...thanks Mama!!!

Also, I have actually tried to apply fake lashes before and not one person even noticed that I was wearing them.

Although it's not really needed for me, what girl doesn't want fuller looking lashes?  I saw this pin about making your natural lashes appear to be false.

I watched the video one day and decided that I would make this trick a part of my morning routine.  I have documented the results below with photos, see for yourself, this really does work!


Before

Cheap-o Eyeliner I Use ;)
After Applying Eyeliner


Eyelash Curler (or torture device, as my hubby says haha!)

Curling!


After Curling
The 2 Mascaras I Used

After 1st Mascara Application

After 2nd Mascara Application


I really love my results, and I have been using this method to apply my eye makeup since I saw the pin and watched the video! 

Hopefully you have good luck with it!  Please share your results!

Also, I want to let you know that I do not buy any eye makeup remover, I use baby oil.  It works wonderfully with a cotton ball.  I swear that's all that is packaged in the eye makeup remover at the store, anyway!


Tuesday, November 20, 2012

Tomato Cage Christmas Decoration - PROVEN

I am pretty sure most of my friends have used this little trick already, but I thought I would share my experience.

When I saw this pin on a cool homemade Christmas decoration, I just had to try it!

I was able to borrow some tomato cages from my awesome cousins Shanna and Kevin ;) 
I thought I would need an extension cord, but the outlet I was going to use doesn't have a 3-prong socket so I was able to improvise.


Make sure you CHECK YOUR LIGHTS before you go through the entire process of wrapping them around the tomato cage.  I had tested mine about 5 days prior to this and figured I was safe.   I was wrong.  I waited until it was dark out and flipped the switch inside and nothing happened.  I checked everything and all the plugs were in order, it was the lights.  Something must have happened to them in the 5 days since I had checked them last.  Bummer!
 
Because of my mishap I had to wait until I had some more free time to re-wrap the lights and was just now able to complete my project 3 days later. 


My front porch has a light and last year I purchased a Light Socket Adapter so I had a good place to plug in Christmas lights.  Since I couldn't use an extension cord with the adapter I purchased I was able to prop up my "tree" on the grill ledge!  Love to improvise!
 
I am very pleased with the results and I would greatly recommend this project for you.  Really, all you need is a tomato cage and a a string of lights.  I guess you could doll it up a little with some tinsel, a star or some other decorations but I didn't want to risk losing anything in the blizzard-like Michigan winter.
 
Happy Holidays!!!


Friday, November 16, 2012

Homemade Baby Food - PROVEN


Every Spring, my husband and I plant a couple of massive gardens.  We grow everything from hot peppers to pumpkins. 

This year, we had a baby to consider when planting the garden so we decided to plant a few extra summer squash and zuchinni plants.

Fortunatley for us, Madison was loving squash baby food right at the time it was coming ripe in the garden.

Summer Squash
I found this recipe for Homemade Baby Food on Pinterest and have used it several times since.  It is very easy, even if you don't grow a garden, produce can be quite a bit cheaper to purchase than baby food!

Squash, cut into chunks, skins on, boil until tender (only leave on skins for ages 6 months +, smaller babies have a hard time digesting the skins.

I made several batches of this food, I used summer squash and zuchinni mixed or just summer squash alone with no added flavorings and it was a huge hit in the Denig house!


Pureed in Food Processor


I saved all of her purchased baby food containers for easy storage

All done!  Ready to eat!

Explosive Shower Head Cleaner - PROVEN

Finally!!!  I used baking soda as a cleaner and I wasn't disappointed.   

Once again, we have a water softener on the brink of a break down and well water that is really rusty, so we get a lot of rust build up.  Scrubbing the tub, sinks and toilets is a constant pain but I wanted to test this idea out I found on Pinterest to remove water residue and build up called the Explosive Shower Head Cleaner.

I wasn't expecting much, since I haven't had great luck with the cleaning pins, but I wanted to test it anyway.


Before


Vinegar and Baking Soda Mix (Explosive Mix)
Let soak overnight (I didn't have a twist tie so I used a large hair tie!)


I noticed that the water build up and residue was greatly diminished, if not gone completely in most places on the shower head. Also, it actually removed some of the rust, which I wasn't expecting (I'll have to scrub with some CLR or "The Works" to finish the job) but that's fine with me.


After using this product the shower seems to have more water pressure since there is no more build up around the spouts!

Overall, I am very pleased with these results!

Thursday, November 15, 2012

Treating a Pimple with Toothpaste - BUSTED

Risking embarassment and showing pictures of a pimple I would usually cover up completely.  I'm here to give the facts people and sometimes that comes at my own expense!

I read on Pinterest (and elsewhere) that putting toothpaste, not gel, on a pimple overnight will greatly reduce it's size and appearance if not remove the pimple completly.  I put this theory to the test last night.

Below are my before, during and after pictures, don't laugh....

Before applying Toothpaste

I used Colgate

Redy for bed!

Bummer, not much difference at all!
I left the paste on all night and in the morning, I swear it was more red.  This after pic is after applying foundation but no concealer.  Looks like I should just use my toothpaste for my teeth!  Better luck next time, Pinterest!